Saturday, November 04, 2006

Second Chances

When Baking Illustrated first came out I couldn’t wait to get my hands on it! I gleefully clutched the book and ran to the kitchen as soon as it arrived. I thumbed through and was a little disappointed with the “illustrated” - or lack there of - part of the book. But, still, knowing from whence this book sprouted I felt sure that it would be a goldmine of wonderful recipes. I have to say when I started reading I found the descriptions of how each – and – every - recipe was formulated and – each - and – every - variation, I started to get a little put off. I kinda found it pretentious – and COMPLICATED. It seemed like they worked really hard to make recipes as complicated as possible to scare away the new bakers among us.

My first choice was for a pumpkin cheesecake – now cheesecake doesn’t scare me, but this one gave me pause – I mean really, spread the pumpkin on paper towels and soak out the juice – then cook it then blah blah blah, really seemed to take the long way round to get to the end…and don’t get me started on jamming a thermometer into cheesecake to check for doneness. Puh – Leez. That is what God gave you eyes for dude. Long story short – the Pumpkin Cheesecake was not well received at my thanksgiving table – it was grainy, and somehow dry and mushy at the same time. SO, away with you Baking Illustrated. I banished it to the cookbook shelf in the cellar never to darken my kitchen again.

Okay so that was a little harsh, but I have SO many cook books, that when one is a disappointment out of the gate, I just tend to shuffle it aside and run screaming back to my old faithfuls.

Well, I brought this baby back out when I decided that I needed a new chocolate cookie recipe – I have been making the “Neiman Marcus $250 Cookie” for about 9 or 10 years, since it first circulated on the internet. And ya know, I would have paid $250 for it because it has never failed to get rave reviews. Always thick, always chewy, always chocolaty – but a little lacking in the butteriness of, say, a Toll House Cookie. I felt it was time for a change so I dragged out all the cookbooks that I had with chocolate chip cookie recipes – and BI was one of them. What really prompted this was my good buddy Alton Brown on Good Eats. I saw his show on Chocolate Chip Cookies and thought I should maybe try his ideas. Well, I looked all the books over, compared with Alton and realized that his Thick and Chewy was almost the same as the BI version. Hmm.

I decided to give BI a second chance and try this cookie. Now don’t get me wrong – they had tried to disguise this simple cookie in a wacky “rip the dough ball in half and jam it back together" complication, but I was too smart for um – I saw the possibility hidden in the weird instructions.

I simply used a #20 cookie scoop and called it a day – no ripping no jamming – I mean really what did the poor dough do to me to deserve such violent treatment? I did add a few extra chocolate chips because I feel that no recipe EVER adds enough chocolate, but don’t go crazy here, maybe a half cup, no more. You still want to have some dough in your cookie.


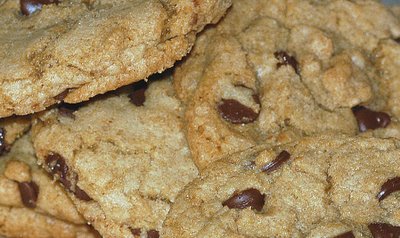
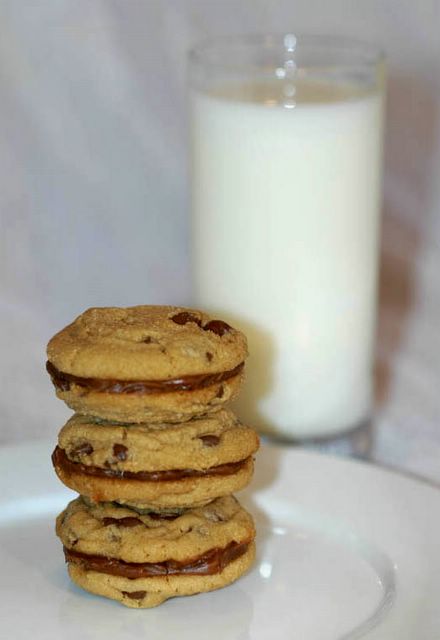
NEARLY PERFECT CHOCOLATE CHIP COOKIE


All things considered, this cookie was thick, chewy, chocolate AND buttery – very nearly perfect (nothing is EVER perfect!) and my new favorite.

Moral of the story? Everyone deserves a second chance – even a cookbook.

Thursday, October 12, 2006

Happy Anniversary Bon Appetit!


Wow, 50 years! It's hard to believe this magazine has been around longer than me - kinda hard to believe ANYTHING has been around longer than me lately but that's another blog!

I couldn't wait to get home when I bought my 50th Anniversary Issue. BA is on one my fav's and I knew there would be some really good stuff inside. Well, boy was I right, cheesecake, veal chops, baked rice and yes quiche. My mouth was absolutely watering just looking through.

I chose this little quiche because, well, it didn't look like a quiche, so demure and thin, but boy does it pack a ton of flavor! The only change I made - one that I always make with savory crusts - is to add a little black pepper to the crust. Other than that - I just followed the recipe to a very yummy end!

The flavor is big, but not over poweringly cheesey, the shrooms are - well - who doesn't love shrooms? I carefully caramelized the shallots so their flavor was deep and sweet. The whole thing came together pretty quickly and was well worth the effort. This one is a keeper!

Stay tuned I have several more recipes that I plan to try from this issue so I'll be sure to post the results.

Sunday, October 01, 2006

Fall - Comfort Food


I have to admit I am not a big fan of fall. I mean sure, crisp sunny days, falling leaves (and who is going to rake them I might ask?!?!) yada yada yada, but in my book crisp means cold and cold means winter! Falling leaves? A huge mess and now my yard looks naked and sad.

But, that being said , I do love fall food. Apples, cranberries, squash, pumpkins; beautiful colors and beautiful flavors. Fall is the time in my house when serious comfort food starts making its appearance. Baking is just the thing for a cold, yucky, rainy day like today.

One of my favorite things to bake is cake, any kind of cake - cheesecake, chocolate cake - CAKE! Nothing like a big slab 'o cake to chase away the rainy day blahs. Fall means apples and for me, apple cake. Nope, not pie, not a huge fan of pie 'cause I like the dough to fruit ratio to be more even than the skimpy bit of dough you get with pie. I'm turning to my good pal Cooking Light once again, and the choice is a recipe I have had for 10 years and it hasn't failed me yet!

My day was pretty full so I made the cake with what I had on hand, which meant the original recipe was not light anymore. I didn't have fat free cream cheese (bad girl) and I never EVER use margarine, so I made a full fat version the cake. Full fat really didn't change the cake much except to make it a little more moist than the low fat, but that is definitely not a bad thing. I have made this following the directions exactly and been just pleased with the out come. So, to fat or not to fat is up to you.
When it comes to apple I am by no means an expert, mostly around here your get mac's, but since the recipe calls for Rome you may have to do a little detective work - trust me, skip the Granny Smith for this one, too tart. Mac's get too mushy and take your cake with them. Try to find a good eating apple that is not too juicy, no, Delicious won't do either. I've tried all these and it is best if you use the Rome, which are not so easy to find, or I use Braeburns because they are big, hold their shape when cooked and are pretty plenitful around here too.

This cake will fill your house with lovely cinnamon smells and the glistening sugar on top can only make you smile.

Sunday, September 17, 2006

Sunday Dinner - Reconnecting.


GRUYERE, ARUGULA & PROSCIUTTO STUFFED CHICKEN WITH CARAMELIZED SHALLOT SAUCE

Did you ever find yourself going along with your day to day and realize that things were starting to slip? You turn around and realize you haven’t eaten a real sit down meal in like 3 weeks and your poor family is subsisting on PB & J. Well, I did! These days it seems like we are running all the time, but getting nowhere! I mean you get the laundry done (okay most of the laundry) and deal with the household hoo-ha, walk the dogs and we’re painting the house every free minute... By the time you stop for the day you want to smack anyone who might actually want you to drag out a pan and create a culinary masterpiece (and the mess to go with)!

This realization has caused me to re-institute the Sunday Dinner. There are a few self-imposed rules; it gets made at home, by yours truly (squinting my eyes and remembering I LOVE to cook). It is a real honest to Gawd meal, not a one pan wonder – and no box dumping (unless it is pasta). When ever possible, the meal should have at least one new item or recipe. Not so bad really, it has made me actually slow down on Sunday and think about a nice relaxing dinner with M.

This week in pursuit of, I brought out my Cooking Light 2003 Annual Recipes Book and after much flipping I made a choice. I gotta tell ya, I love CL and all, but their cookbooks are a very confusing jumble. Jumble not withstanding I came across 3 of my favorite things; chicken, cheese and prosciutto – all in one recipe. Yeah! Hurray! This recipe calls for arugula too, not one of my favorites, and difficult to find around here (not to mention grossly expensive). Go ahead and use spinach if you need to, don’t fuss too much, the end result will still be yummy.

I made a few changes to this recipe ; I doubled the cheese, not so light any more, mostly because my chicken looked rather empty with only a half an ounce of cheese (this adds about 62 cal. per serving). I also added a bit of chili to the sauce for a twist. I rolled instead of folding as folding sounded like it might be a touch too messy to flip. The rolling actually took a bit longer in the oven, but by the time I had reduced the sauce twice as called for, the chicken was done and it all came together beautifully. Oh, and another diet buster; I found the pan to be a bit dry after cooking the chicken, so I added a little butter (this only adds about 25 cal per serving) before sautéing the shallots.

All this being said; the flavor was terrific and the presentation was great. I can’t help but think that folding wouldn’t have been half as pretty. I tossed some potato gnocchi in a bit of sauce for a side.

Light a candle, serve up some of the left over wine and you have yourself one nice Sunday Dinner!

Cheers M.

Wednesday, September 13, 2006

Strapping on the feedbag


For some people - literally!

Please, please go to Lex Culinaria and have a read of "No Farting While Eating. Please?" for Table Manners 101. I could not have said this any better myself!

If you can stop laughing, think about how many times you are guilty of one or more of these little foibles - then call your Mom and apologize!!

Monday, September 04, 2006

The Other White Meat


PORK TENDERLOIN WITH CARAMELIZED ONIONS AND GREEN PEPPERCORN SAUCE

Many moons ago when I moved to Australia I realized that I had better learn to cook or M and I would starve to death! I mean seriously, a fancy dinner involved some chicken cooked with in an inch of dust bowl consistency in way too much butter and AuGratin Potatoes a-la Betty Crocker! And they don't know Betty in Oz! Let me tell you for the first few weeks in OZ we pretty much ate the same meal over and over again ‘cause even the McDonald’s (affectionately known as Macca’s down under) food tasted different.

I still had training wheels on my pots and pans when I met my neighbor – and soon to be life long best friend – over the garden fence. In a fit of neighborly excitement I invited my new victim to dinner that weekend. She gracefully accepted and the panic set in! What was I thinking – I had never thrown a dinner party before!

After much frenzied running around and visiting of the local butcher shops (yes, they still have those in Oz – we actually had 2 in Mt Eliza) I decided on pork tenderloin. I had never cooked a tenderloin before, but thought I could swing it. And swing it I did, the meat was good the veg was good, and the starter soup was actually the star. The only foible was that when my guests arrived – keep in mind I was in a complete state of panic – they handed me a bottle in a brown bag. Like a dunce I just popped that bad boy in the fridge. Well, that bad boy was a VERY expensive bottle of Redman red wine. Not wanting to be difficult my guests kept quiet thinking maybe in the US we chill red wine. God, was I ever embarrassed when M took the bottle out of the fridge at dinner and realized what it was and how much it was worth. We had a good laugh about it; but I still feel like I owe my friends a good bottle of Redman!

Where I am going with all this, is that I chose the pork on a whim, but as it turns out pork tenderloin has become one of my favorite – if not the favorite – meat choice for dinner. In the years since my first attempt I have learned quite a bit about cooking meat and with the aid of a fabulous little gadget, I have no fear of ruining a great cut of meat. With a little meat thermometer inserted before tossing the meat to the flames I am assured that it will be perfectly, rare, well done medium, you name it ‘cause this little gem actually beeps at you when you hit the desired temperature! Okay, so this isn’t the only thing it takes to make a great tenderloin but it is the biggest part of the puzzle. Over cooking meat will ruin it, not matter how good the rub, marinade or glaze.

Recently I found a fabulous guide in meat prep in Niman Ranch Cookbook. Formerly I cooked roasts at the same temp all the way through, with great results (thank you again Polder). However, after reading this book – and book it is, not just a cookbook – I learned quite a bit about meat and what happens when you cook it. Since I got this book I have followed their procedure of “sear and slow” I have found the meat I have cooked to be more tender and more flavorful than ever before.

This lovely piece of pork was coated with a mixture I use for both beef and pork (works with chicken too). I admit to having used a prepared green peppercorn sauce, I mean seriously who has green peppercorns hanging around 24/7? There are s-o-o-o many great prepared sauces out there now, that I don’t feel guilty about using them. Don’t be afraid to embellish a package sauce to make it your own – I added a bit of butter to give this sauce some body and a little extra richness. Occasionally I have replaced half the water with cream, really rich!

I am attaching my “recipe” but I recommend you buy the cookbook and follow their instructions for roasting the loin or any meat for that matter. Read it carefully and know that they may not follow FDA guide lines exactly, but I have had NO problems cooking my pork medium. Enjoy!

Monday, August 14, 2006

Sunday, August 13, 2006

Lemony Heaven


LEMON SEMIFREDDO RECIPE

What is a Semifreddo you ask – well - absolute heaven is my answer!

While on the hunt for a dessert that was suitable for guests, yet different from my usual offerings of chocolate and cheesecake, I came across this recipe at the Star Chefs website. I was looking for something light, and off the wall. The meal I planned was going to be a definite stick to the ribs, so I wanted something light like mousse – and to tell you the truth lemon came up because I had bought this HUGE bag of lemons just ‘cause they were so-o-o pretty and yellow. Then what the heck was I going to do them? Well, many have starred in my latest craze – sorbet - but the thought of something that might taste as bright as they looked, well… I went in search of…I found surprisingly few lemon mousse recipes on the world wide, and they all contained gelatin. Not that I mind a bit of gelatin, but I wanted light, not spongy and spongy is a pitfall (for me at least) with gelatin.

***Pathetic confession: I can not make Jello***

Even though I was really searching for was a refreshing mousse, this recipe intrigued me. I didn’t really want “ice-cream” (how boring) but I had never heard of Semifreddo before. I looked over the recipe and, stupidly, thought I could make this recipe and skip the freeze to make it mousse-like. Well, I was wrong – the thing never set, so I dumped it in the freezer and went about looking for something else. I must say I spent a good amount of time pouting about this! (Will I never learn, this guy wasn’t a Star Chef for nuthin’!)

Well, after a day of searching, I had gotten over my tantrum that this dessert insisted on being frozen. I decided that my instinct about this dessert just could not be THAT far off. Besides, time was getting away and I needed something to serve the next night!! So, I decided to give it a taste. Well imagine my surprise when I tasted the smooth creaminess that is Semifreddo. My, oh, my, I had accidentally fallen on the perfect summer confection. Light, creamy and somehow not ice-cream, yet cold and luscious just the same. I really thought I was going to get a spongy, puckery, lemony mouthful, but no it was like a sweet lemon drop cloud. So smooth; cold, but not brain-freeze cold. Lemony; but not squint your eye like Popeye lemony, just delightfully sweet.

The original recipe called for other things – tuiles, candied kumquats; all complicated additives that I gave a pass to. I topped this desert with a little raspberry sauce and served it up.

This dessert can be as simple as you like – add the extras, or not, you decide. But trust me it is worth a try!

Sunday, August 06, 2006

Weekend Cat Blogging - The Amazing Miss Penny


The crowd roars as the Amazing Miss Penny prepares to perform a feat of great acrobatic ability!


A little warm up - look at that concentration...


Argh - what strength - what agility...


And there you have it folks - did you see that?!??! The fantastic, blinding speed of the patented Penny flip.


"Please, no applause - just throw catnip..."


Visit some other special kitty kats with Heather & her sweet kittens, Clare and Kiri are taking a much needed rest.

Tuesday, August 01, 2006

EBAY SUCKS!

Yup you read it right – eBay sucks. I got screwed.

Now, I’ve been a cynic all my life, but this time I though hey, maybe there really are honest people in the world. I mean my son has been shopping on eBay for year and has been very satisfied. I mean Christ he bought a friggin’ car on eBay – got a good deal and he loves it! So why not give it a whirl right?

I was given an exquisite – and VERY expensive – Murano Glass “Love Knot” sculpture 3 years ago by the Fabulous M as a Mothers Day gift. It was beautiful and out of character as a gift for him and I loved it like a living thing (weird right?). This piece was a limited edition signed numbered original work of art. Only 500 were made and I had number 134.

Last year, on that Dreaded Day, the thing managed to jump off its pedestal, while no one was around, and break. There was utter pandemonium in the house! HOW COULD THIS HAPPEN!?!?!? We blamed the dogs – nope, they were not even in the house when the discovery was made. We blamed the house keeper – nope, she was long gone when it happened. M – Nope, he was on a different floor but heard the tell tale thump when the body hit the floor. Cat – no way the thing weighed more than her – besides that piece had been sitting on the same pedestal for nearly 2 years. I made the tragic discovery when I got home from work. A sad mystery. I cried for 2 days.


This is my original piece - look at how delicate and smooth that point is!


Yes, I really am going somewhere with this.

Click here to read more non-food related ranting....

Monday, July 31, 2006

THERE'S A FUNGUS AMOUNG US


Alright I’ve had it with all this snooty white truffle oil and shaved truffles and morel consommé crap…There must be something wrong with me ‘cause I don’t like morel mushrooms and truffles (the pig excavated kind not the luscious chocolate kind) make me want to yak. I mean that “earthy” flavor that everyone loves so much – well I usually try to wash the dirt OFF my food, so ya lost me there. I mean I gotta ask you, who really would gleefully pay hundreds of dollars a pound for well, pig chow? The truffle is a fungi, now my mom was pretty adamant about foot washing so’s you didn’t get a fungus. Okay, not very scientific, so lets get scientific

Go to Wikipedia and check out truffles I dare you…


Truffle describes a group of edible mycorrhizal (subterranean) fungi (genus Tuber, class Ascomycetes, division Mycota)…Click on ascomycetes you get… Members of the Division Ascomycota are known as the Sac Fungi and are fungi that produce spores in a distinctive type of microscopic sporangium called an ascus (Greek for a "bag" or "wineskin").
SAC!?!? Nice very nice indeed.


Back to the pigs for a minute…Do you know WHY pigs are used to find truffles? Okay so dogs are too but they need to be TRAINED to find truffles – not so pigs…read on:

“Looking for truffles in open ground is almost always carried out with specially trained pigs or dogs. Pigs were the most used in the past, but nowadays farmers prefer to use dogs, which do not eat the truffles (Dogs won’t eat them?!?! But dogs lick their butts!). Both pigs and dogs have keen senses of smell, but while dogs must be trained to the scent of truffles, female pigs or sows need no training whatsoever. This is due to a compound within the truffle which has an uncanny resemblance to the sex pheromone of male pigs or boars to which the sow is keenly attracted. It may have been the strange attraction that pigs have to these fungi which prompted its discovery by early human populations.”

EEE-YUCK!!!!!! OH-MY-GAWD!


Enough already, I can’t stand it any more!!!! Does this not look like a giant poo?

Sunday, July 30, 2006

CUTE FOOD REDUX

Okay, so I did decided on a use for the cutie pie zucchini. I went with the keep-it-simple-stupid method. Figuring that they would be rather delicate like a baby zucchini, I simply tossed them with some S&P, garlic and olive oil. I could not wait to pop them on the grill and get some itty bitty grill marks! Well, I got the grill marks (sorry no photo – it was late and we were hungry!) and yes they were really cute. We tasted them and well, what did they taste like?

Zip. Zero. Nada!

What a disappointment, they were totally lacking flavor, somehow even the garlic was diminished by the lack of - well – taste of any kind. So, next time, I’ll just take a pretty picture and leave it at that!

Saturday, July 29, 2006

CUTE FOOD


Globe Zucchini

Okay so it's been eons since I last posted - no excuse just too darned busy. But today when I was in the grocery store I saw the cutest little zucchini and well, I just couldn't resist. They we so sweet looking and tiny I just had to bring them home - kinda like a kitten! These little guys aren't much bigger than golf balls - which we have zillions of hanging around. The fabulous M being a very good golfer.

Not sure what I plan to do with them, but stay tuned I'll figure out something - well - cute - to do with them!

Wednesday, July 05, 2006

Shrimp with Mango Sauce


SHRIMP WITH MANGO CITRUS SAUCE RECIPE

I love to cook as you might have guessed. But I really like to cook for guests. Life being what it is – busy and completely void of time…we don’t get to entertain as much as we would like. Of course the fact that I make a huge production out of most dinner parties could be the reason. I plan way ahead, I write menus, then change them, then change them again until I have what I think is the perfect meal.

The occasion? My brother and his wife are making the trip to my place for dinner. What’s the big deal? I live a cut lunch away from everyone in my family – far enough that you can’t just drop by, yet close enough that you have no excuse to not make the journey once in a while.

Now, I have several appetizers that I rotate, and this time I have decided on one of my favorites (did I mention that my menus only contain things that I love to eat?); Seared Shrimp with wilted bitter greens and Mango Citrus Sauce. The shrimp are simple and hot while the sauce is multi layered and cold (if all goes well in the plating!). The greens add a nice greenness (is that a word) to round out the whole plate.

I know I got the idea for this sauce from a magazine, but I scribbled it in a note book and have no idea what magazine it was. I can tell you that it was at least 10 year ago that I started making this. So to give credit where credit is due, this sauce is an inspiration, not an invention. Thank you to the unknown cooking magazine Gods for the help!

Saturday, June 24, 2006

Cool and Refreshed!


HONEYDEW MELON SORBET

Yet another hot and humid evening here is New England - not that I am complaining it beats snow every time! The sticky heat gave me an excuse to bring out the Ice Cream Maker that M gave me a few weeks ago. I have to say this little gem has definitely earned it's keep!

Over the past few weeks we have luscious cool sorbet on hand at all times. I wowed the kids (okay so they are all grown up, but they are still kids to me!) on Father's Day with a selection of sweet sugar free sorbet for dessert instead of my usual cheesecake - still watching that waist line!

Last night I was too hot to bother with dinner, ya know how sometimes it's just too e-ooey to eat a heavy meal? Well, I happened to have some melon sorbet base already made so refreshment was just a moments away!

This base was adapted from Alton Brown's recipe, but I have used splenda and left out the alcohol as it seems to make the sorbet more granita-like. I also added a little fresh ginger juice - a fantastic combination!

Like my other sugar free sorbets, this sorbet does not benefit from too long a stay in the deep freeze. Make sure you don't over process in the machine, you want a soft serve texture not a granita (scraped ice). A good idea if you want to make this more than an hour ahead is to put the sorbet on the door, not deep inside your freezer.

Sunday, June 18, 2006

Okay, so it's not food...

Bearded Iris - up close and personal!

Too hot to cook but not too hot to walk the property and reap the rewards of many hours of digging in the dirt!

Saturday, June 17, 2006

Dinner Interrupted - First Course


Cream of Watercress & Zucchini Soup


So, you plan you buy you create and what happens? Your guest gets sick. Of course you show the appropriate amount of concern for the ailing party, I mean they must be at death’s door if they have to miss one of my fabulous dinners right? But, now what do you do, you have a fridge full of food that you normally would not have around – who keeps a 3 pound filet mignon hanging around the fridge.

Do you freeze and have franks and beans instead? Nope – you have a beautiful dinner for two.

First course; a pale green zucchini and watercress soup adapted from Emeril Live on the Food Network. This soup is smooth, tasty and a great starter - almost all veggie but still thick and creamy. I cut the cream down to half, but you can skip the cream altogether for a healthier soup without loosing the silky texture. It has become a standard in my entertaining repertoire.

Monday, June 12, 2006

Dog Blogging Weekend


Doin' the Happy Dance!

This is my reward for a particularly nice breakfast! We call it the happy dance - he calls it just plain fun!

Sunday, June 11, 2006

Polenta for Lunch


Who says impulse buying is bad!

Every once in a while you pick up something totally new when you go to the store, with no idea of what you plan to do with it. It kind of hangs around waiting for an inspiration that causes you to bring it out of the fridge and make it fantastic. Well such was the case with a roll of ready basil polenta. I have always liked the idea of polenta – I've just never gotten around to making it.

The day started on a completely different note - with tomatoes. Last week while I was at the bulk food store I came across a huge package of roma tomatoes. Their bright red color immediately made me think of slow roasting. It was rainy cold and yucky so what better day to turn the oven on and fill the house with warmth and yummy smells. Besides, they are a good thing to have in the fridge for a quick sauce or just on a cracker with some nice wine. Now everyone has their own recipe for slow roasting or oven drying, what ever you want to call it. I go for roasting because I don't dry the tomatoes out completely. I like them still moist and a bit soft, but not fresh tasting.

I had popped the tomatoes in the oven early in the morning and gone about my house work. It wasn’t long before the smell of garlic and oregano started to fill the place. Every time M or I passed through the kitchen it was an occasion to say “Wow that smells great!”

When noon time rolled around we went through the usual laundry list of what to have for lunch. Sandwich? No. Soup? No. Gee that smells good. Take out? No. Then - I swear a light bulb actually popped up over my head – the polenta jumped into my mind. An idea!

I grilled up medallions of the polenta topped them with a fresh basil leaf (who doesn’t always have fresh basil on hand, right?), a fragrant tomato right from the oven and some cheese. Whip the whole thing under the broiler to brown the cheese and you’ve got yourself something pretty special. Wow. Needless to say M and I were quite pleased with this little inspiration. It’s nice to have a special lunch once in a while were you actually eat something nice on a pretty plate, instead of something you just grab and eat with your hands.

In a larger portion, I liked this as a lunch, but it would hold its own quite well as a first course – or cut the polenta into bit size pieces and serve as an hors d'oeuvre.

GRILLED POLENTA WITH ROASTED TOMATO RECIPE

Monday, June 05, 2006

Guilt Free Strawberry Sorbet - Almost


Summer in a bowl!

It was very warm this past weekend and I had a real hankering for some ice cream. I have to admit to a significant amount of whining. Now for this reason and that, we try to keep sugar out of the house. Lately fatty food has been fooda-non-grata too. Yeah, yeah, I know; what is a chocolate lover doing banishing sugar and fat?!?! Well, that’s just the way it is – most of the time - of course I fall off the wagon a lot, but I try. Then, the fabulous M had a brilliant idea – let’s have some sugar free, low fat ice cream – he’d even buy me a present - an ice cream maker.

Well, just the thought of a present made me take notice, but sugar free AND fat free ice cream? What’s the point? Never one to turn down a present, especially a kitchen power tool – I hopped in the car and away we went shopping.

Luckily I haven’t gotten over my need for strawberries yet…and since I have a new toy why not use both! I carefully read the instructions while depositing my tank in the freezer for an unbearable 6 hrs! I tweaked the provided Strawberry Sorbet recipe and replaced the sugar with Splenda. I left the corn syrup in though as I was concerned about crystallization, so there is still a bit of "sugar" left in the recipe. I chopped, I whirred, I chilled and then it was time to deposit my creation into my new toy!

In a surprisingly short amount of time I had a beautiful soft serve textured sorbet that was an explosion of strawberries and sweetness in the mouth. I diligently followed the instructions to "ripen" the sorbet in the freezer for 2 hours…kind of a mistake! Because I hadn’t used a true sugar syrup, my sorbet turned a bit hard due to crystallization. Next time I will cut the curing to about 45 minutes before eating. A little time to melt on the counter helped, but the texture was not as “creamy” as it could have been. It is definitely a sacrifice I am willing to make though, for something I can eat with wild abandon and zero guilt! The flavor was still great, it was low sugar (not sugar free, bummer) and completely FAT FREE. I’ll make this again…and again…and again.

STRAWBERRY SORBET RECIPE

Sunday, May 28, 2006

Strawberries, Strawberries, Strawberries!


What do you love about Memorial Day weekend? Is it the burgers, the dogs? Or is it the sweet succulent first strawberries of the year?

Well, I admit those first burgers of the year are pretty near my favorite thing ever! But...I do have to confess that I don't feel quite complete at the end of the BBQ without some strawberries and cream , or maybe strawberries and icecream or better still Strawberry Shortcake! That's it! Fluffy sweet biscuits, heaps of strawberries and billowy clouds of chantilly cream. Now there's a perfect finish to any great BBQ.

STRAWBERRY SHORT CAKE
Preheat oven to 450

Sweet Biscuits
2 Cups Self Rising Flour
1/2 Teaspoon Salt
1 Tablespoon Sugar
1 oz Butter
1/2 Cup Milk
1/4 Cup Water

Mix flour, salt and sugar in a medium sized bowl, rub butter in with fingers until the mixture resembles bread crumbs. There shouldn't be any chunks of butter visable. Make a well in the center.

Combine milk and water and pour into flour well. Mix lightly to combine. Dump onto lightly floured surface and kneed until it comes together - DON'T over work it! Pat into a circle about 3/4 inch thick. Either cut with 2 inch cookie cutter or VERY sharp knife into wedges. Either way you should have 12 biscuits. Lightly brush top with milk (or melted butter).

Place on an ungreased cookie sheet about 2 inches part. Bake for 10 minutes or until lightly golden on top. Cool completely on a rack.

Strawberries and Sauce

1 Quart Fresh Strawberries (this doesn't work well with frozen)
1 Large Navel Orange
1-2 Tablespoons Sugar (or 1 Tablespoon Splenda)

Rinse and hull strawberries. Cut in half - quarters for larger berries, and place in a large glass bowl. You need to cut them at least in half to get the juices to flow. Sprinkle sugar over the berries. If you like your berries sweet use both tablespoons. You can omit the sugar all together if you think your berries are sweet enough. Juice the orange over the berries. Don't worry if it seems a little dry - the berries will give up their juice as they sit. Refrigerate for a few hours.

The good thing about this recipe is that the acid in the orange juice will keep your berries firm and red for quite a while, not gray and mushy as with water. When you choose your orange be sure that the orange you choose seems heavy for its size. That will mean that it is full of juice!

Chantilly Cream

1 Pint Heavy Cream (very cold)
1 Tablespoon Sugar
1 Teaspoon Vanilla
1 Teaspoon Cointreau

In a very cold, but not frosted, bowl beat the cream until beaters leave trails. Add sugar, vanilla and cointreau (if using) continue beating until soft peaks. If the mixture starts looking clotty STOP, you are on your way to butter! You want you cream to be a little loose, not stiff and dry.

Assemble your short cake how ever you like - I split the biscuit and top with berries, cream then the other half. More berries more cream!!! Yum!

Thursday, May 18, 2006

Wednesday, May 17, 2006

Milk & Cookies


Want one?

MILK CHOCOLATE-PEANUT BUTTER SANDWICH COOKIES
(Taken from Bon Appétit Magazine February 2006)

Be sure to use regular peanut butter — not old-fashioned or freshly ground — for the best consistency in the cookie batter and the filling.

Cookies
1 3/4 cups all purpose flour
1 teaspoon baking powder
1/2 teaspoon baking soda
1/2 teaspoon coarse kosher salt
1/2 cup plus 1/3 cup powdered sugar
1/2 cup plus 1 tablespoon (packed) dark brown sugar
6 tablespoons (3/4 stick) unsalted butter, room temperature
1/2 cup creamy peanut butter
1/2 cup vegetable oil
1 1/2 teaspoons vanilla extract
1 large egg
1 1/3 cups (about 8 ounces) milk chocolate chips

Filling
3 ounces high-quality milk chocolate (such as Lindt or Perugina), chopped
1/4 cup creamy peanut butter
2 tablespoons powdered sugar
1/4 teaspoon coarse kosher salt
6 tablespoons whipping cream

For cookies:
Preheat oven to 350°F. Whisk first 4 ingredients in medium bowl. Using an electric mixer, beat the powdered sugar, dark brown sugar, and butter in large bowl to blend.
Add peanut butter; beat until creamy. Gradually beat in vegetable oil and vanilla extract, then egg.
Add dry ingredients; mix just until blended. Stir in milk chocolate chips.
Drop cookie dough by level tablespoonfuls onto ungreased baking sheets, spacing about 1 1/2 inches apart. Bake cookies until puffed and golden brown, about 12 minutes. Cool slightly, and then transfer cookies to rack to cool completely.

For filling:
Place chocolate, peanut butter, powdered sugar, and kosher salt in medium bowl. Bring whipping cream to boil in heavy small saucepan. Pour hot cream over chocolate mixture; stir until mixture is melted and smooth. Chill until filling is thick and spreadable, about 1 hour.
Spread about 1 rounded teaspoonful chocolate-peanut butter filling on flat side of 1 cookie. Top with second cookie, forming sandwich. Repeat with remaining filling and cookies. (Cookie sandwiches can be made 1 day ahead. Store cookies in an airtight container at room temperature.)
Makes about 2 1/2 dozen sandwich cookies.

*I used a cookie scoop but did not get 30 – more like 20. Also the cookies domed a bit; to flatten them drop the cookie sheet right when you get it out of the oven from about 2 inches above the counter (gently). Be sure also to let the cookies rest on the sheet for 2 or 3 minutes as they are quite fragile when hot.

Monday, April 17, 2006

I Heart Brownies


Better than Brad Pitt - ya think?

Brownies, you love um right? That sweet slightly under cooked yumminess that makes you close you eyes and smile. Well, have you ever come across something that try as you might you just can’t make properly? Everyone humanoid on the planet can simply dump a box and ♪ta da♪ beautiful brown onion skin on the outside and chocolaty goodness on the inside. Well, not me; bricks, that’s what get, I can make the lightest sponge you ever had the joy of tasting, but brownies? Bricks. Why I ask you?!?! What is the magical secret to making brownies? Is there a club? Can I join? Am I over thinking this? It’s very sad, I call myself a baker and I can’t bake a recipe that was a mistake to begin with –brownies supposedly were created when someone left the baking powder out of a chocolate cake. I’ve tried the box, I’ve tried scratch – I’ve tried blondies. Nope, could’t do it. I started to think that I should just stick to cheesecake!

Well, finally I have found a recipe that I can make to perfection. Not quite the usual fudgy yet cakey brownie we are all used to but - WOW. My dear friend Chocolatier Magazine has come to the rescue yet again! This recipe is not your grandma’s brownie that’s for sure. It is also not one to whip up for the kids. Go ahead give one to the little ankle biter in your house and – if he likes it, which he might not – watch his head explode from the sugar. The chocolate taste is deep, intense and sweet but not the sweetness that would appeal to most kids. It definitely has a grown up taste and – cut small - would make a great passed desert for a cocktail party or event. The texture is little grainy, but fudge like as well, no real cakeness to it - but it goes will with the smoothness of the topping.

Of course I won’t give up my search for the perfect brownie, but this will definitely be on my top 10 hit parade of desserts to impress. Now the name is a bit hokey, but don’t be afraid! I mean “Better-Than-Brad-Pitt Brownies” come on…what could be better? These are pretty darned close!

Better-Than-Brad-Pitt Brownies
(Polka Dot Cake Studio Taken from Chocolatier Magazine Feb/March 2006)

Brownies:
14OZ unsweetened chocolate, chopped.
1/4C non-alkalized cocoa powder
1 1/2C (3 sticks) unsalted butter, softened
3 granulated sugar
1 teaspoon salt
6 large eggs
2C all purpose flour, sifted
10OZ semi sweet chocolate morsels
2C chopped walnuts

Glaze:
4OZ semisweet chocolate
4T unsalted butter
1/2T light corn syrup

Make the brownies: Position rack in the middle of the oven and preheat oven to 300°F. Butter bottom and sides of 9 X 13 baking pan. Line bottom with parchment (I allowed enough to hang over sides of pan to use as handles).

In a large bowl, combine unsweetened chocolate and cocoa powder. Place bowl over pot filled 1/3 of the way with barely simmering water and heat, stirring frequently, until melted and smooth.

In bowl of electric mixer, using paddle attachment, beat butter, sugar and salt together at high speed until combined and light, about 2 minutes. Add eggs one at a time, beating well after each addition and scraping down sides of bowl as necessary. At low speed, add flour in three additions, mixing just until blended. Add melted chocolate, chocolate morsels and walnuts and mix until combined. Scrape batter into pan and bake 20 to 25 minutes, or until top is set but still soft and edges are just beginning to pull away from sides of pan (a tooth pick will still come out gooey at this point). Cool completely in pan on a wire rack.

Cover pan and refrigerate brownies for 6 hours or overnight before glazing)
Glaze the brownies: Combine all the glaze ingredients in a medium bowl and place over a pot filled 1/3 of the way up with barely simmering water. Heat stirring, frequently, until chocolate is completely melted and smooth. Remove from heat and let cool for 5 minutes.

Invert brownies and remove from pan. Peel off parchment and re-invert so they are right side up. Pour glaze over brownies and, using off-set spatula, spread evenly to edges. Refrigerate brownies for 10 minutes (no longer or the glaze will harden too much and the brownies will be hard to cut), to set glaze.

Using a sharp knife (use a long one), cut brownies into 24 rectangles (I made triangles).

*Note. Don’t leave out the nuts; they are a needed texture here. If you want nut free make a different recipe!

Tuesday, April 11, 2006

Did Someone Say Cake?


Well, not having a lot of time on my hands – means that occasionally I need to think ahead when a few unaccounted for minutes come my way. On one such an occasion a week or so ago I got the urge to bake. Now for me, baking is the fun part. I don’t necessarily have to eat it – well not right away anyway. So, I whipped up a nice hazelnut sponge from my old friend the Good Housekeeping Illustrated Cookbook. They call it the "Filbert Torte", but that's a little high brow for me. Sweet, but not too sweet and nutty but not like a mouth full of nuts. My urge being satisfied I popped that little treasure into the freezer for a rainy day.

Okay, so it didn’t rain on Saturday, but M mentioned cake and I was off.

Cake I said, yes, we can do cake. Out came the sponge to thaw. I didn’t need a lot of thought on what to pair with it, White Chocolate Ganache from Rose Levy Beranbaum's Cake Bible would do the trick quite nicely. Out came my prized stock pile of Callebaut White Chocolate (time to buy some more I am getting desperately low) and Lindt White Chocolate bars. I prefer the Lindt bars for creaminess in the ganache, but nothing beats Callebaut for taste and snap for the chocolate leaves I planned for garnish. Since it is spring I thought a few raspberries in the middle might be nice too.

After one failed attempt on the ganache – boy am I out of practice – I have some advice for anyone who tries Rosie’s recipes - follow the instructions exactly! Sadly I didn’t the first time and had to toss the result due to solid chocolate on the beaters! Well, when I did follow the instructions I got the silky smooth whipped cloud I was looking for.

You don’t have to go to the trouble of making your own chocolate leaves if you don’t want to. Nowadays you can buy chocolate shapes in the grocery store. I prefer to make my own, but hey that’s just me.

Hazelnut Sponge
(Adapted from Good Housekeeping Illustrated Cookbook 1988)

6 Eggs, separated
3/4C Sugar
1/3C Dried, plain bread crumbs
1/4C Flour
1C Ground Hazelnuts (available from King Arthur Flour)
1t Vanilla (the recipe calls for this in the topping I add it to the cake)
1 tray of fresh raspberries

2 Recipes White Chocolate Ganache (The Cake Bible)
White Chocolate Leaves

Preheat Oven to 325°F

Beat Whites to soft peaks at high speed. With mixer on gradually add ¼ C sugar. Continue eating until stiff peaks form (do not over beat or your cake will be dry).

In another bowl beat egg yolks at medium speed until lemon colored and thick. Gradually beat in sugar and vanilla until blended. Stir in bread crumbs, flour and 2/3 C nuts.

Lighten egg yolk mixture with a few tablespoons of egg white; fold remaining whites into yolk mixture. Pour into 9 x 3 inch spring form pan (DO NOT use a non-stick pan, and DO NOT GREASE PAN.)

Bake 40 minutes or until top springs back when lightly touched. Invert cake in pan on wire rack if it has not grown over the edge of pan. If it has; place an empty ring from another 9 inch pan under it and place all that on the rack to cool complete. This keeps the lightness and height in tack.(Now you can freeze this cake for up to one month with no adverse effects.)

Split the cake in half horizontally. Spread about a cup of ganache over cake and place an even layer of raspberries into ganache, reserving a few for garnish. Press down lightly and cover raspberries with more ganache.

Top with remaining layer, coat liberally with ganache, top and sides – it doesn’t need to be perfect, but as smooth as you can.

Lightly press remaining nuts onto the sides of cake and arrange chocolate leaves on top in a flower pattern. Place reserved raspberries in the middle.

Tuesday, April 04, 2006

In Search of Butterscotch


When I was a kid any occasion for a gathering of people was an occasion to bring food. Weddings, funerals, visiting the family of a sick friend, you name it; the little old ladies would bring out their “secret family recipes”. Heaps of casseroles; a virtual landscape of cakes and cookies as far as the eye could see. (Keep in mind this is the memory of a twelve year old so…) Not one single cold cut tray in sight – for shame – no; only things made with their own hands were acceptable to bring to someone’s house.

It was on one such occasion when I was twelve that I was introduced to butterscotch. It’s funny how the weirdest things stick in your mind, but well there was this butterscotch cake. (My eyes have now rolled up into my head and I might faint…) I can still remember what it looked like, all burnt orange colored with a dark chocolate glaze. It was cooked in an angle food cake pan – I didn’t know that then, but that was the shape of it. It was dense and moist, almost pudding like, and oh so yummy. I swear that I ate half that cake all by myself that day. On occasions like these no one monitored what the kids were eating! No such thing as too much sugar, or too many calories. When I was a kid kids played outside all day; so over eating was never an issue. Heck, sometimes we even ran with scissors! Oh to be twelve again.

Well, ever since then I have been in search of that taste. I haven’t found it yet – try though I might. I’ve tried blondies and cookies, cakes and candy. Nope I just can’t get there.

Recently I visited the site of The Canadian Baker and clicked on the link there for the Hershey’s Kitchens web site. As I always do with any new site; I clicked on recipes and like wise candies…it’s that chocolate thing again. Anyway, the first recipe, staring at me like a beacon was their “Butterscotch Nut Fudge”.

Well guys, this has to be the best butterscotch recipe I have tasted so far. Okay, so it’s not THE cake, but the flavor is right and the creaminess brings to mind all things buttery. Give it a whirl you’ll be glad you did!

Don’t get crazy and cut the pieces bigger than an inch, this is one sweet, rich treat; less is definitely more here.

Butterscotch Nut Fudge
(from Hersey’s Kitchens)

1-3/4 C Sugar
1 jar Marshmallow fluff (7.5 oz.)
3/4 C Evaporated milk
1/4 C Butter (1/2 stick)
1-3/4 C HERSHEY'S Butterscotch Chips (11-oz. pkg.)
1 C Chopped salted mixed nuts (I used cashews)
1 t Vanilla extract

Line 8-inch square pan with foil, (I used parchment it worked fine) extending over edges of pan.

Combine sugar, marshmallow fluff, evaporated milk and butter in heavy 3-quart saucepan. Cook over medium heat, stirring constantly, until mixture comes to full boil; boil and stir 5 minutes. Be REALLY careful here because this stuff spatters a lot, I’ve got the burns to prove it!

Remove from heat; gradually add butterscotch chips, stirring until chips are melted. Stir in nuts and vanilla. Pour into prepared pan; cool.

Refrigerate 2 to 3 hours. Remove from pan; place on cutting board. Peel off foil. Cut into squares. Store tightly covered in refrigerator. About 5 dozen pieces or about 2-1/4 pounds candy.

NOTE: For best results, do not double this recipe.

Sunday, March 26, 2006

My Mother's Chocolate Cake


My mother was not a baker. She baked exactly 6 times a year – birthdays, five kids and my dad. She never baked anything else, which is not to say we were deprived of sweets and cookies and what not. Oh no, we had cookies and candy like other kids but Mr. Nabisco and Mr. Keebler were the bakers in our house. Sarah Lee came by every now and again for a no bake cheesecake, the foundation of my love for all things cream cheese!

When my mother did bake – 6 times a year – it was always the same thing. My Mother’s Chocolate Cake with vanilla frosting; lovingly prepared with a whole pound of icing sugar and half a ton of butter. Frosting variations came into play later on when we met our good friend Betty – the queen of the tub-o-frosting. Now there’s a lady I could look up to!

Needless to say I did not learn my baking skills at the hip of my mother – or my grandmother for that matter. Mr. Keebler visited her house quite frequently also. No, my lover of baking blossomed later in life when I lived in Australia and realized that I had better learn to cook or M and I were going to starve to death! And learn I did, I endeavored to master all the foods I missed. Master I did not - but I fancy myself a very good cook and an even better baker. There are even a few things that I make of which I am truly proud.

My mother was not a baker, but… My Mother’s Chocolate Cake is- with out rival - the best chocolate cake I have ever had. The cake is a true depression cake, no eggs no butter, and a rather dense crumb. She had a tattered piece of note paper with a hand written recipe tucked into the 1955 printing of the “Woman’s Home Companion” cookbook. Who knows where she got the recipe; it was not in that cookbook, which I still have and still use. The other day I dragged it out because I had an idea and wanted to include My Mother’s Chocolate Cake. I was heart broken to find that the tattered note paper was gone. I had long ago committed that recipe to memory, but knowing that that note was gone made me sad.

My newest creation would need a firm dense cake to stand up to the dense cheesecake. We wouldn’t want it to squish! So with My Mother’s Chocolate Cake (which I have written on note paper and replaced in the book) and my own rendition of White Chocolate Cheesecake I created this towering beauty: The Black and White Ribbon Cake.

My mother was not a baker, but I think I am, I hope that she will be proud.

Wednesday, March 15, 2006

Dog Blogging - Bath Day


The Princess of our house - Niki - enjoying a nice nap after a hot bath.

Quick and Colorful Friday


Fridays are always a toss of the coin when it comes to dinner. The fabulous M picked up some lovely haddock on his way home, but left it to me to figure out what to do with it. Well, with determination I ran to the local market close to work, hoping beyond hope that something inspirational would jump into my basket and bring along a few friends to complete a fast and yummy repast. I roamed among the beautiful greens and yellows of the green grocer department – and there it was – ta da - purple cauliflower! What will they think of next!!! How could I resist that regal looking crown shining amid the ordinary pale creams and odd looking green heads? I snatched up the last glorious head as well as some huge lemons and baby spinach – I had a plan now! Dinner came together in a snap and was not only tasty but nice to look at.

The color was a bit brighter than you see here. All and all - the price being the same - a nifty addition to a rather basic looking meal.

Easy Baked Haddock

Preheat Oven to 350º

1.5lb Haddock (skinned)
1/2C Mayonnaise (recommended Miracle Whip Lite)
2C Prepared Herb stuffing (recommended Pepperidge Farm)
2 Lemons
S&P

Lightly oil a GLASS, or any non-metal baking dish, large enough to accommodate your fish. Set aside.

Process the stuffing in the food processor until fine and almost all the chunks are gone. You don’t want big pieces as we are not going to wet this crust very much and those bits can get mighty hard! You should end up with about a cup.

Place the fish, in the dish, edges touching; its okay to have a little wiggle room around the outside edge. Try to make the fish all the same depth even if it means folding the thinner bits under, this will help it to cook evenly. Brush the fish evenly with the mayo, use more if you need to. Salt and paper, then cover the fish evenly with the stuffing crumbs. Squeeze the juice from 1 ½ of the lemons over the stuffing. Reserve the other lemon half for serving.

Bake the fish until done. Yeah, I know I should give you a time. In my oven it only takes about 15 to 20 minutes, but I never really time it. You will start to smell the herbs from the stuffing when it is nearing doneness. Check after 15 minutes by pulling a small bit from the edge to see if it is white and the flakes stay whole. If it is and you have made your fish layer even it will all be done at this point, if you are worried check the middle as well. If you don’t feel its ready check it again in 5-7 minutes, you don’t want crumbly flakes because that will mean dry fish.Wasabi

Sweet Pepper Tartar Sauce

1C Mayonnaise (recommended Miracle Whip Lite)
2-3 T Sweet Pepper Relish (recommended Howard's)
1-2t Wasabi Powder (find this in the international foods at your market)
1-2t Warm Water
1/2t Lemon Juice

Mix enough of the water with the wasabi powder to make a thick paste - don't make soup. Let the paste rest a few minutes to develop the heat.

In a small bowl mix together half the mayo, lemon juice, wasabi paste, and half the relish. Taste and adjust the heat - or sweet - to your taste. I use all the relish and usually all the wasabi.

*Note: Fish is quick so be sure to prep your veggies first (we steam) and have them ready to turn on when you pop your fish in the oven. Toss your spinach with a little butter and white balsamic vinegar to give it a boost beyond the ordinary.

Wednesday, March 08, 2006

Oscar Day 2006!

Although chocolate is my first love, I had a hankering for something a little different for Oscar Day. Yes, Oscar day is a big event around here – well for me anyway. I have possession of the clicker for the entire day – and woe be to the one who changes the channel when I am making a potty run! The day is mine and I always whip up something special just for me.

I had spotted this recipe on The Wednesday Chef and, since I also love Nigella I thought I would give it a go. As promised the recipe came together tout suite, and the smell…heavenly! I peered through the oven window like Johnny Bench waiting for the game winning pitch in the World Series. Waiting patiently for that “barely colored” surface to reveal itself. And there it was, 32 minutes later, the lightly golden edges and matte finish – time to remove the pan from the oven. I whipped up the icing and doused the shortbread as directed. As you can see the out come was a beautiful thing…but. Well, I wasn’t happy with the texture. The taste was lovely and spicy, but a little doughy. I was hoping for that tender sandiness of old world short bread. The edges were there but closer to the middle the doughyness came through more than I would have liked. Should I have cooked them longer? I think yes, at the risk of a dryer edge. The icing though lovely and fragrant was just a little too rich and never quite set; I think I would add a bit less butter and some water next time. Will there be a next time? Oh yes, I think that perhaps operator error may have been the problem. Who am I to question the Domestic Goddess!


Cinnamon Squares

Time: 45 minutes, plus cooling

For the base:
½ cup confectioners' sugar
1½ cups plus 1 tablespoon flour
1 teaspoon baking powder
1 teaspoon ground cinnamon
½ pound (2 sticks) cold butter, cut into small cubes
Pinch salt (I couldn’t help myself)

For the icing:
6 tablespoons butter
1 tablespoon cane syrup like Lyle's Golden Syrup (or substitute dark corn syrup)
½ cup confectioners' sugar
1 teaspoon ground cinnamon.

Prepare base: heat oven to 325 degrees. In a food processor, combine confectioners' sugar, flour, baking powder and cinnamon. Pulse until free of lumps. Scatter butter cubes across top and pulse again until mixture is crumbly and beginning to come together.
Press mixture evenly into a shallow 9- to 9½-inch square baking pan. (I used a 9 ½ inch fluted tart pan) Bake until shortbread is firm, barely colored and no longer has a sheen on its surface, about 30 minutes. Remove from oven and cool on a rack until warm.
While shortbread cools, prepare icing: In a small saucepan over low heat, melt butter and syrup together. Whisk in the confectioners' sugar and cinnamon until free of lumps. Remove from heat and allow to cool just until slightly thickened. Whisk again and pour over the warm shortbread, using a spatula to reach edges. Allow to cool completely, and then cut into 16 squares.
Yield: 16 squares.

Dog Blogging Wednesday


This is my taste tester Oso. Isn't he cute up there on the bed where he doesn't belong? Where does a 112 pound Akita sleep - anywhere he wants!

Friday, February 24, 2006

Jumping in!

To the clueless blogger in all of us I salute you! Today is my first day - hurray for me! Keep watching for some yummy photos of yummy food!

Yours in cocoa!

Di