Sunday, March 26, 2006
My Mother's Chocolate Cake
My mother was not a baker. She baked exactly 6 times a year – birthdays, five kids and my dad. She never baked anything else, which is not to say we were deprived of sweets and cookies and what not. Oh no, we had cookies and candy like other kids but Mr. Nabisco and Mr. Keebler were the bakers in our house. Sarah Lee came by every now and again for a no bake cheesecake, the foundation of my love for all things cream cheese!
When my mother did bake – 6 times a year – it was always the same thing. My Mother’s Chocolate Cake with vanilla frosting; lovingly prepared with a whole pound of icing sugar and half a ton of butter. Frosting variations came into play later on when we met our good friend Betty – the queen of the tub-o-frosting. Now there’s a lady I could look up to!
Needless to say I did not learn my baking skills at the hip of my mother – or my grandmother for that matter. Mr. Keebler visited her house quite frequently also. No, my lover of baking blossomed later in life when I lived in Australia and realized that I had better learn to cook or M and I were going to starve to death! And learn I did, I endeavored to master all the foods I missed. Master I did not - but I fancy myself a very good cook and an even better baker. There are even a few things that I make of which I am truly proud.
My mother was not a baker, but… My Mother’s Chocolate Cake is- with out rival - the best chocolate cake I have ever had. The cake is a true depression cake, no eggs no butter, and a rather dense crumb. She had a tattered piece of note paper with a hand written recipe tucked into the 1955 printing of the “Woman’s Home Companion” cookbook. Who knows where she got the recipe; it was not in that cookbook, which I still have and still use. The other day I dragged it out because I had an idea and wanted to include My Mother’s Chocolate Cake. I was heart broken to find that the tattered note paper was gone. I had long ago committed that recipe to memory, but knowing that that note was gone made me sad.
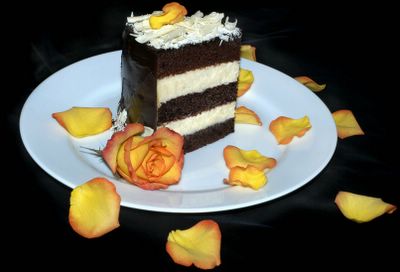
My newest creation would need a firm dense cake to stand up to the dense cheesecake. We wouldn’t want it to squish! So with My Mother’s Chocolate Cake (which I have written on note paper and replaced in the book) and my own rendition of White Chocolate Cheesecake I created this towering beauty: The Black and White Ribbon Cake.
My mother was not a baker, but I think I am, I hope that she will be proud.
Wednesday, March 15, 2006
Quick and Colorful Friday
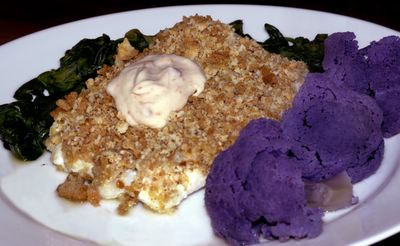
Fridays are always a toss of the coin when it comes to dinner. The fabulous M picked up some lovely haddock on his way home, but left it to me to figure out what to do with it. Well, with determination I ran to the local market close to work, hoping beyond hope that something inspirational would jump into my basket and bring along a few friends to complete a fast and yummy repast. I roamed among the beautiful greens and yellows of the green grocer department – and there it was – ta da - purple cauliflower! What will they think of next!!! How could I resist that regal looking crown shining amid the ordinary pale creams and odd looking green heads? I snatched up the last glorious head as well as some huge lemons and baby spinach – I had a plan now! Dinner came together in a snap and was not only tasty but nice to look at.
The color was a bit brighter than you see here. All and all - the price being the same - a nifty addition to a rather basic looking meal.
Easy Baked Haddock
Preheat Oven to 350ยบ
1.5lb Haddock (skinned)
1/2C Mayonnaise (recommended Miracle Whip Lite)
2C Prepared Herb stuffing (recommended Pepperidge Farm)
2 Lemons
S&P
Lightly oil a GLASS, or any non-metal baking dish, large enough to accommodate your fish. Set aside.
Process the stuffing in the food processor until fine and almost all the chunks are gone. You don’t want big pieces as we are not going to wet this crust very much and those bits can get mighty hard! You should end up with about a cup.
Place the fish, in the dish, edges touching; its okay to have a little wiggle room around the outside edge. Try to make the fish all the same depth even if it means folding the thinner bits under, this will help it to cook evenly. Brush the fish evenly with the mayo, use more if you need to. Salt and paper, then cover the fish evenly with the stuffing crumbs. Squeeze the juice from 1 ½ of the lemons over the stuffing. Reserve the other lemon half for serving.
Bake the fish until done. Yeah, I know I should give you a time. In my oven it only takes about 15 to 20 minutes, but I never really time it. You will start to smell the herbs from the stuffing when it is nearing doneness. Check after 15 minutes by pulling a small bit from the edge to see if it is white and the flakes stay whole. If it is and you have made your fish layer even it will all be done at this point, if you are worried check the middle as well. If you don’t feel its ready check it again in 5-7 minutes, you don’t want crumbly flakes because that will mean dry fish.Wasabi
Sweet Pepper Tartar Sauce
1C Mayonnaise (recommended Miracle Whip Lite)
2-3 T Sweet Pepper Relish (recommended Howard's)
1-2t Wasabi Powder (find this in the international foods at your market)
1-2t Warm Water
1/2t Lemon Juice
Mix enough of the water with the wasabi powder to make a thick paste - don't make soup. Let the paste rest a few minutes to develop the heat.
In a small bowl mix together half the mayo, lemon juice, wasabi paste, and half the relish. Taste and adjust the heat - or sweet - to your taste. I use all the relish and usually all the wasabi.
*Note: Fish is quick so be sure to prep your veggies first (we steam) and have them ready to turn on when you pop your fish in the oven. Toss your spinach with a little butter and white balsamic vinegar to give it a boost beyond the ordinary.
Wednesday, March 08, 2006
Oscar Day 2006!
I had spotted this recipe on The Wednesday Chef and, since I also love Nigella I thought I would give it a go. As promised the recipe came together tout suite, and the smell…heavenly! I peered through the oven window like Johnny Bench waiting for the game winning pitch in the World Series. Waiting patiently for that “barely colored” surface to reveal itself. And there it was, 32 minutes later, the lightly golden edges and matte finish – time to remove the pan from the oven. I whipped up the icing and doused the shortbread as directed. As you can see the out come was a beautiful thing…but. Well, I wasn’t happy with the texture. The taste was lovely and spicy, but a little doughy. I was hoping for that tender sandiness of old world short bread. The edges were there but closer to the middle the doughyness came through more than I would have liked. Should I have cooked them longer? I think yes, at the risk of a dryer edge. The icing though lovely and fragrant was just a little too rich and never quite set; I think I would add a bit less butter and some water next time. Will there be a next time? Oh yes, I think that perhaps operator error may have been the problem. Who am I to question the Domestic Goddess!
Cinnamon Squares
Time: 45 minutes, plus cooling
For the base:
½ cup confectioners' sugar
1½ cups plus 1 tablespoon flour
1 teaspoon baking powder
1 teaspoon ground cinnamon
½ pound (2 sticks) cold butter, cut into small cubes
Pinch salt (I couldn’t help myself)
For the icing:
6 tablespoons butter
1 tablespoon cane syrup like Lyle's Golden Syrup (or substitute dark corn syrup)
½ cup confectioners' sugar
1 teaspoon ground cinnamon.
Prepare base: heat oven to 325 degrees. In a food processor, combine confectioners' sugar, flour, baking powder and cinnamon. Pulse until free of lumps. Scatter butter cubes across top and pulse again until mixture is crumbly and beginning to come together.
Press mixture evenly into a shallow 9- to 9½-inch square baking pan. (I used a 9 ½ inch fluted tart pan) Bake until shortbread is firm, barely colored and no longer has a sheen on its surface, about 30 minutes. Remove from oven and cool on a rack until warm.
While shortbread cools, prepare icing: In a small saucepan over low heat, melt butter and syrup together. Whisk in the confectioners' sugar and cinnamon until free of lumps. Remove from heat and allow to cool just until slightly thickened. Whisk again and pour over the warm shortbread, using a spatula to reach edges. Allow to cool completely, and then cut into 16 squares.
Yield: 16 squares.